Oct 102015
 
 October 10, 2015  Uncategorized 6 Responses »

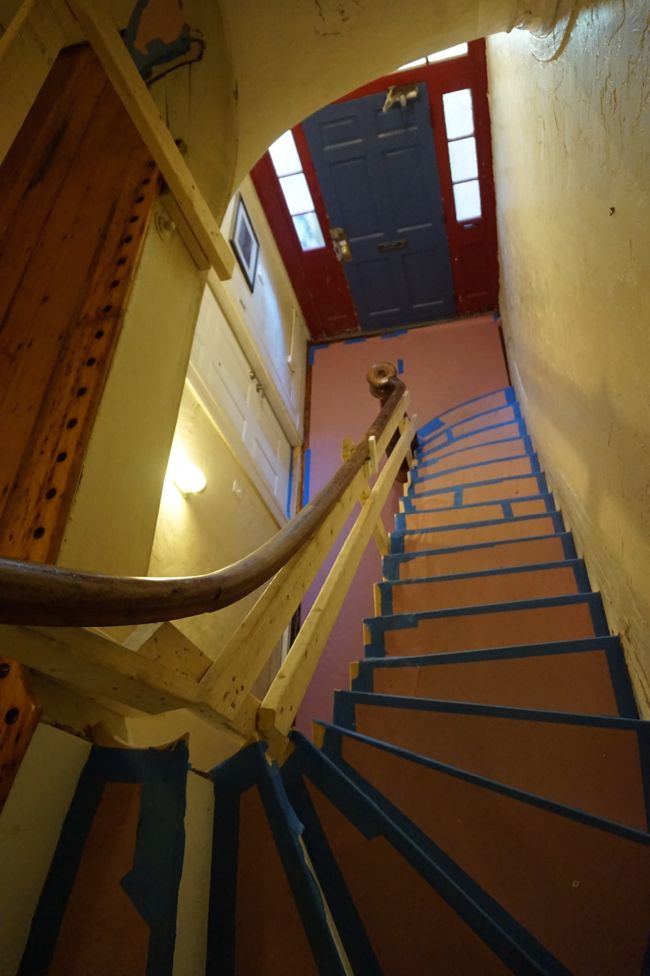
The interior side of my building’s front door is surrounded by a lot of woodwork – side lights, inset paneling, a large transom window. This vertical expanse of wood stretches nearly ten feet tall, looming over the foot of the staircase. And every last bit of it is painted fire engine red.

Red Trim

I’m sure you have a lot of questions right now, like why would anyone paint this section of trim red while leaving all of the trim in the rest of the building white? And why would red trim exist anywhere outside of a 1990s-era McDonalds, let alone in a Greek-Revival row house? Trust me, I’ve asked myself these and other similar questions many times over the past three years, and unfortunately, I don’t think we’ll ever learn the answers.

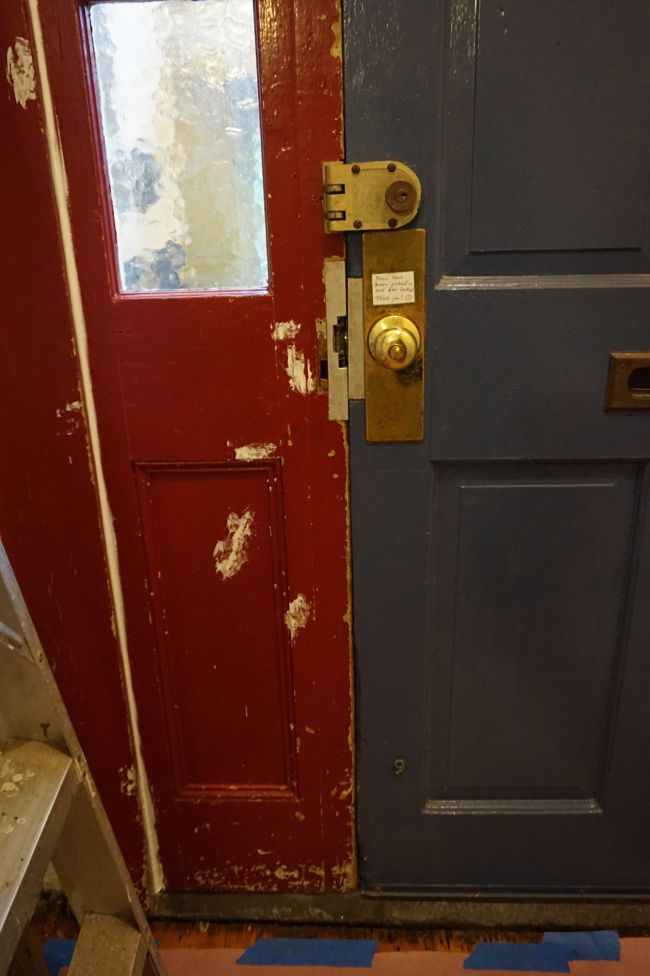
But here’s what we do know. Judging by the number of chips and gouges and scuff marks in the red paint, this trim has been red for quite some time, maybe decades. And, if you look closely at the areas where the red paint has chipped away, you can see that before it was red, the trim was painted teal. Maybe the red was an improvement after all?

If you look at this woodwork for long enough, you’ll also realize that none of it is original to the building. In fact, it looks like the side lights, the transom, and the surrounding trim were pieced together somewhat haphazardly. The whole thing is actually asymmetrical with everything smooshed over toward the right. There’s even a gap along the left corner where you can see part of the original trim underneath the newer trim. But as long as you don’t look at it too closely, it looks fine, so we’re not planning to replace the side lights and transom any time soon.

But after seeing this red trim day in and day out for the past three years, I’d finally had enough this past weekend. So I broke out the primer. Before I got started, I cleaned the trim with a sponge and soapy water since everything in the stairwell is still pretty dusty from sanding and refinishing the floors a few weeks ago. Then I patched all of the chips and gouges with Ready Patch spackle, and caulked some of the biggest gaps. Incidentally, while I was cleaning the trim, I noticed that most of the glass in the side lights isn’t glass at all; it’s textured plastic. Someday it’d be nice to replace the plastic with actual glass, but that’s another project for another time.

Patched Trim

After one coat of primer, everything looked streaky and terrible, but also somehow better than when I started. Even with streaks of red showing through the white primer, the whole stairwell had begun to feel brighter, which makes a huge difference in a space that gets almost no natural light. I now realize that I didn’t take any progress photos at this stage because I was so intently focused on painting over every last bit of red before the end of the weekend.

The next day, I added a second coat of primer since I wanted to minimize the number of paint coats I would need (primer is cheaper than paint). After a second coat, the red had all but disappeared, and later that afternoon I added a coat of paint – Benjamin Moore simply white in semi-gloss, which I’m planning to use for all of the trim in the stairwell.

White Door Trim

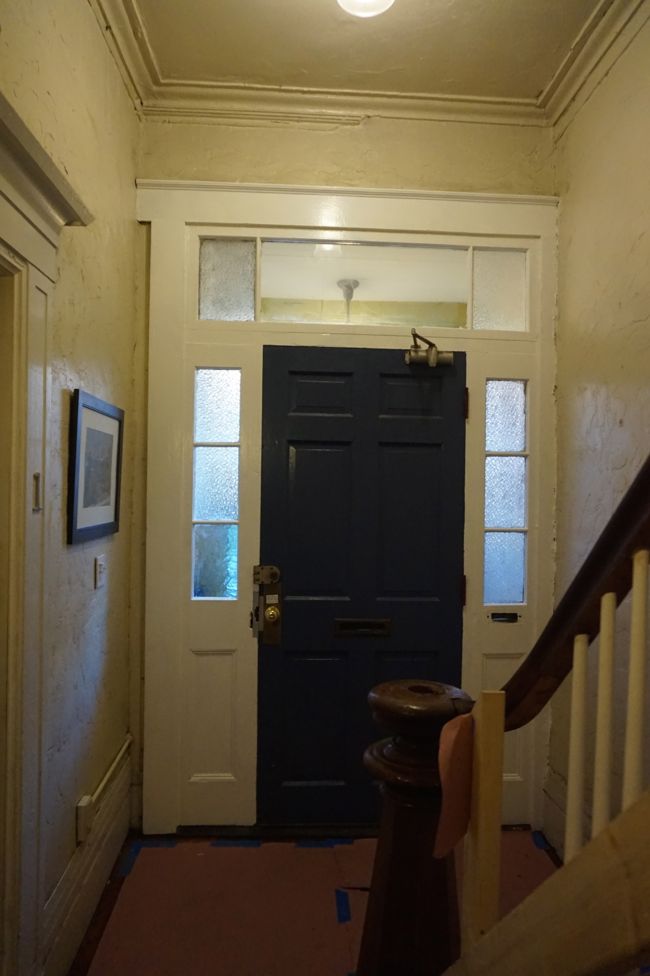
With the red gone, and bright white trim in it’s place, the entire stairwell felt much less depressing. The rest of the trim in the stairwell is currently painted the same dull mayonnaisey white as the walls, so it’s pretty well camouflaged. But there’s so much elegant detail in the trim, from the tall baseboards to the chunky crown molding, that it’s a shame that it’s so easy to overlook. But with the side lights and transom painted, I could begin to visualize what the stairwell would look like with all of the trim painted bright white.

Painted Trim

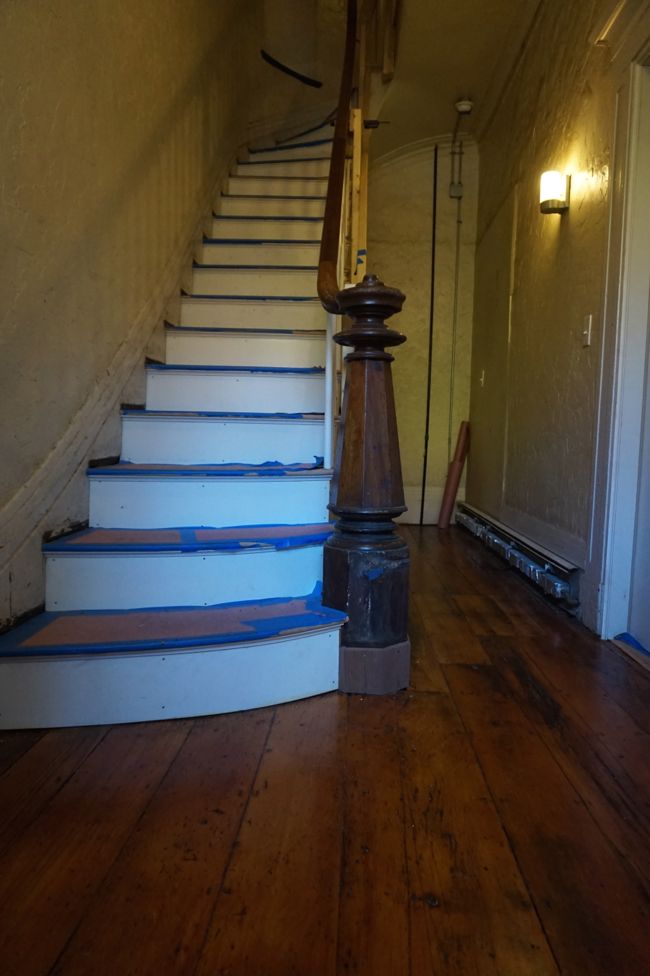
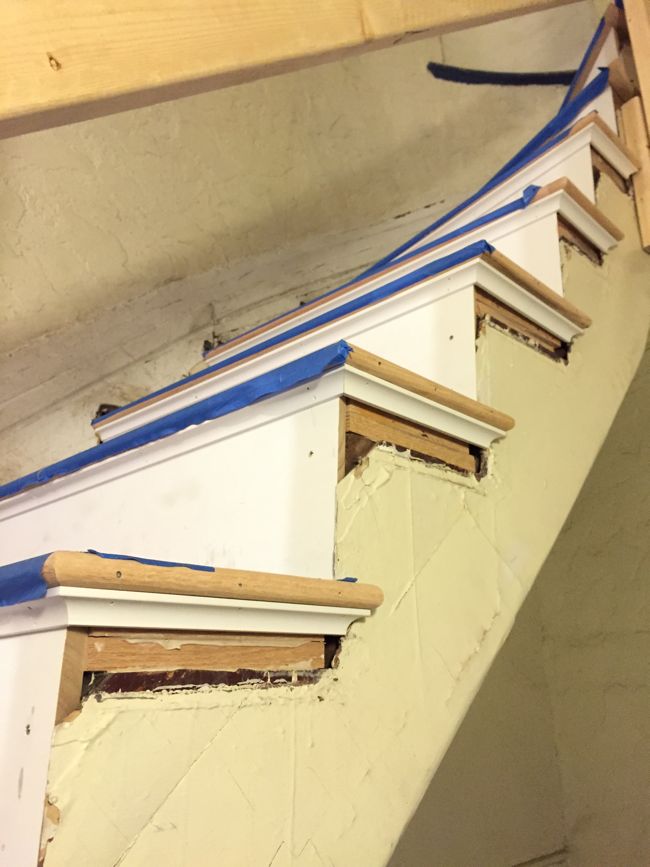
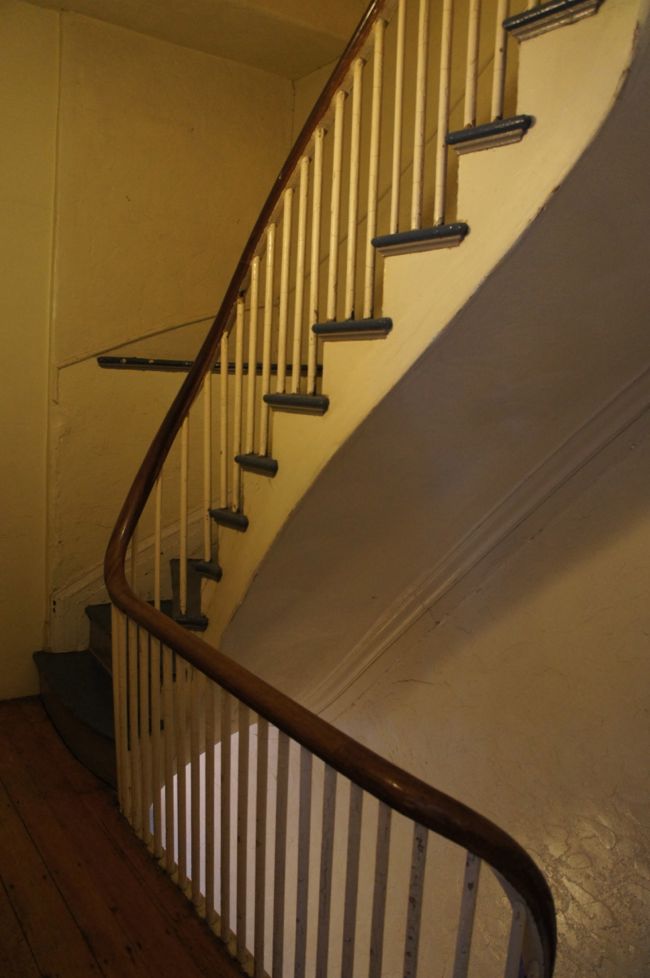
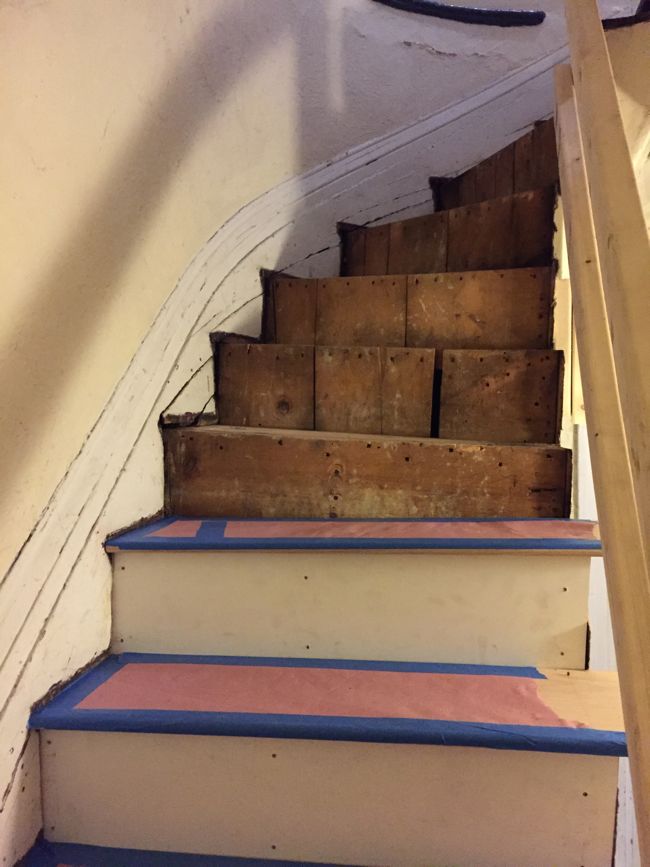
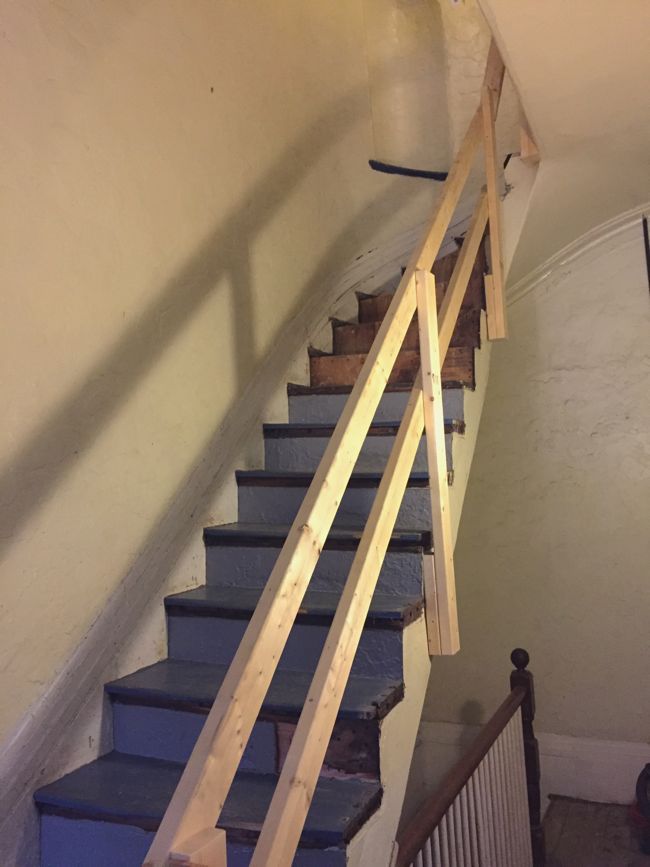
As you can see in this picture, Gregg started installing the balusters this past week. We chose simple, tapered balusters that more or less match the original balusters.

New Balusters

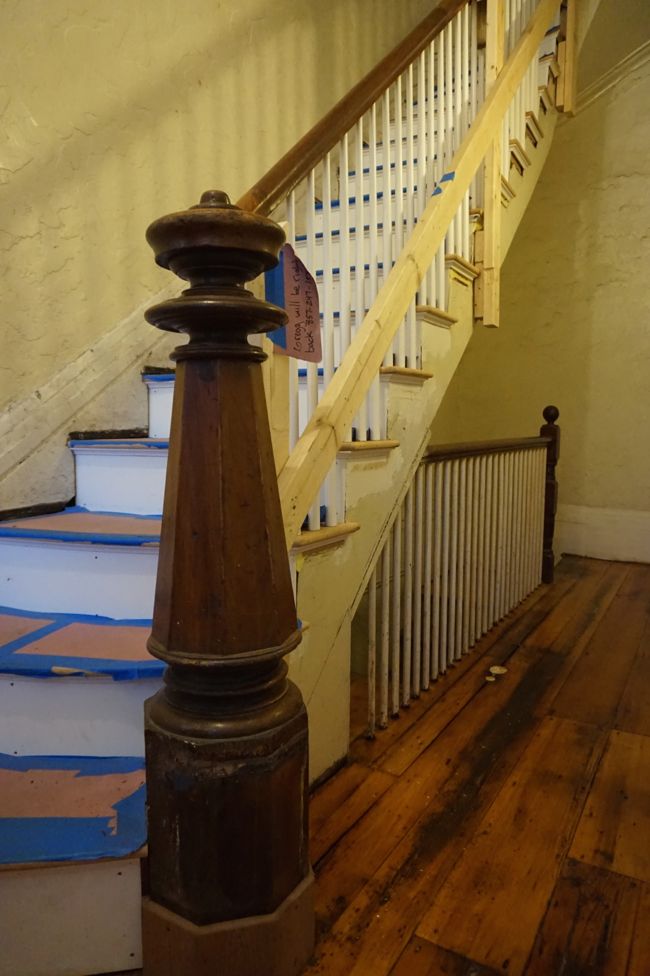
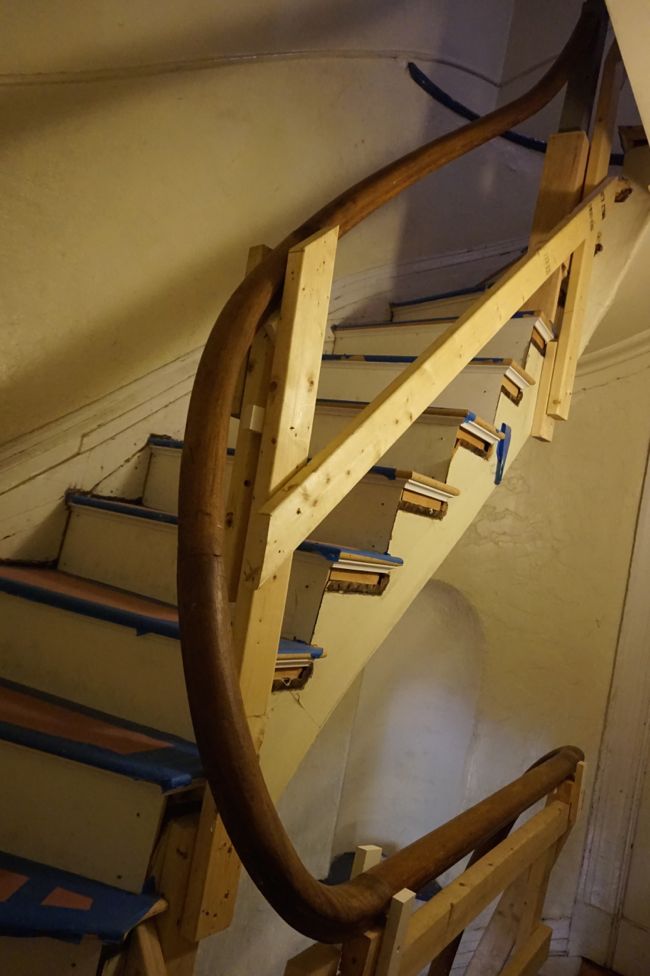
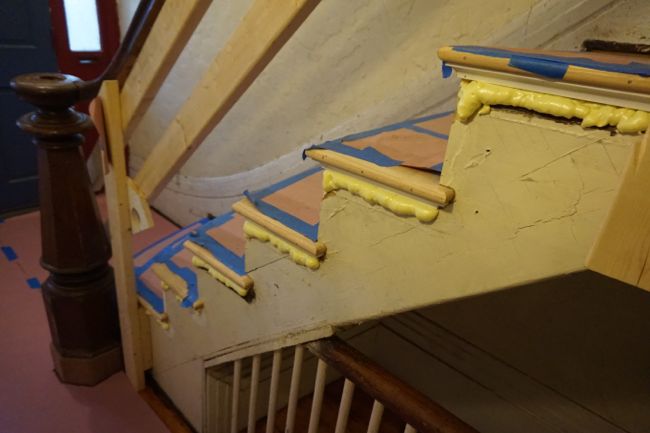
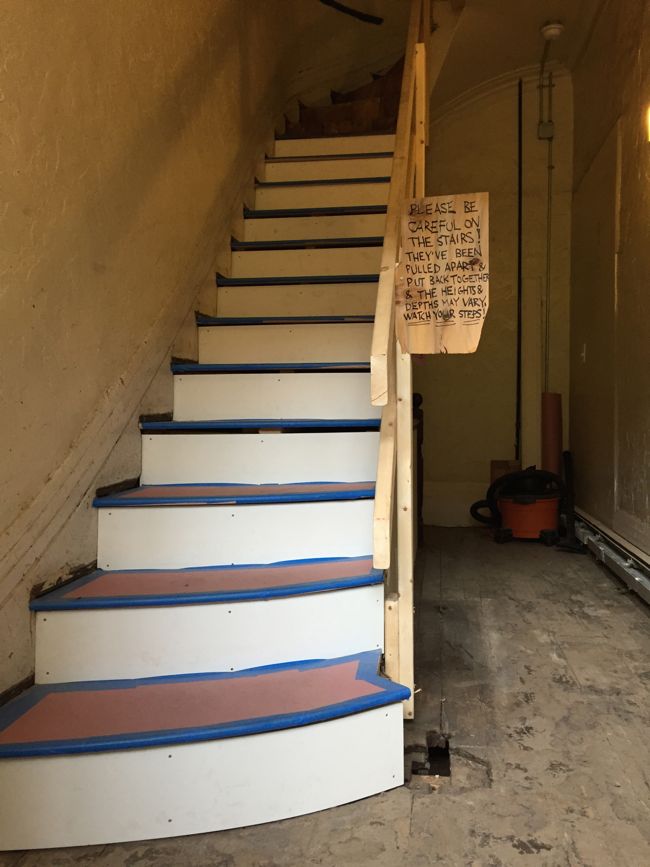
Gregg finished installing balusters most of the way up the first flight of stairs. He’s about to start adding balusters along the curved section of handrail at the top of the stairs, which will be more challenging than the straight section. Here’s the current state of the stairwell – it’s finally starting to come together.

Current Stairwell

Sep 182015
 
 September 18, 2015  Uncategorized 13 Responses »

We returned from a vacation in southwest England (Devon and Cornwall are beautiful if you ever have a chance to go) at the beginning of this week to find that Gregg had reinstalled the old handrail and newel post while we were gone. If you’ve been following along you might remember that the old handrail came in several pieces that could be connected with threaded pins imbedded in each section of handrail. When assembled, the handrail formed a single curved strip of walnut that wound up two flights of stairs and around a landing. Originally the handrail was installed so low that it was mostly out of reach for anyone going up or down the stairs. And since increasing the safety of the staircase was one of the major goals of this renovation, we asked Gregg to raise the handrail a few inches to make it more useable.

Gregg used the temporary 2×4 handrail he  built at the beginning of the project as a brace for the original handrail. This way, he was able to position the entire handrail as a single piece and ensure that everything lined up properly before he actually began the reinstallation.

Braced Handrail

Braced Handrail

At the base of the stairs, the handrail connects to the newel post, and since Gregg raised the entire handrail a few inches, he needed to raise the newel post by the same amount. He planned to build a new base for the newel, but the question was, what would he use to build this new base? Ideally the base would be built out of wood that matches the original newel and handrail, which seem to be made out of 160-year-old solid walnut. Since antique walnut is expensive and hard to come by, we thought about building the base out of pine or poplar and trying to stain it to match the rest of the newel post. But stained wood would always look a little off. Ultimately, we realized that the newel post is the visual centerpiece of the stairwell – it’s the first thing you see when you walk in the door – and spending a little extra on matching wood seemed like the right thing to do.

So after work one day I made the trip up to Longleaf Lumber, a lumber yard in Cambridge that specializes in reclaimed wood. When I visited, they had a huge selection of cherry and pine, but very little walnut. But hidden behind some longer boards, I found rough-cut five-foot length of reclaimed American Black Walnut.

walnut board

The board in question is the darker board in the picture above. It actually looks lighter here than it did in real life. Walnut is some of the most expensive wood that Longleaf carries, and even though this was a small piece, the total came to just over $65. A pricey piece of wood to be sure, but not outrageous in the grand scheme of things. I crossed my fingers, bought the board, and hoped that it would match the newel post.

Back home, Gregg cut the board into eight equal pieces to build an octagonal base for the newel. Here’s the base clamped and glued:

Newel Base

Gregg added a beveled edge to the top of the base to make it look like an intentional part of the newel, rather than a strange modern addition hacked onto the bottom of an antique newel post. While we were away, Gregg installed the base and reinstalled the original newel post on top of it.

raised newel post

The base is unfinished here, so it looks very different from the rest of the newel post. But when Gregg wiped the base down with some water, it matched the original walnut almost perfectly, a good indication that it will blend in seamlessly after a few coats of varnish.

I mentioned at the end of a post a few weeks ago that Gregg had a plan to quickly and easily fill in the gaps left behind when the stair treads were shimmed and leveled. You can see the problem here:

Stairwell Cove Mouldling

And here’s the solution:

Foam Patched Treads

That’s right. High-density spray-foam. This stuff is normally used for insulation, but we’re using it here to quickly fill in irregular gaps. It may seem like a weird solution, but keep in mind that this is a purely aesthetic fix – this isn’t load-bearing foam. The plan is to shave the foam down so that it’s flush with the side of the staircase beneath it. Then I’ll skim-coat over the foam with joint compound. Once everything is painted, it should look seamless. And spraying foam is much faster and easier than cutting little strips of wood to fill in each gap.

Stairwell with Newel

This is where the stairwell stands now. The only work left for Gregg is to install all of the balusters. Then I’ll get started on a mountain of finish work.

Aug 302015
 
 August 30, 2015  Uncategorized 5 Responses »

Refinished Floor

Before we began renovating the stairwell, I had an abstract idea of how the finished project would look – refinished wide-plank pine floors, a level staircase with dark-stained treads, a slightly raised handrail, white balusters and white trim, smooth, flat walls and so on. Even so, it was hard to picture just how all of these elements would come together. But when I came home at the end of last week and opened the front door to completely refinished entryway floors, the first major piece of that picture came into focus.

Refinished Entryway Floors

It was quite the transformation, considering that just a few days earlier the entryway looked like this:

The Stairwell at the End of Week 3

It feels like the stairwell floors are finally breathing a sigh of relief after likely not seeing the light of day for nearly 100 years. The original wide-plank pine flooring was first covered over in linoleum, which was later stripped off, leaving behind the glue and backing paper – the splotchy gray stuff you can see in the above picture. A 1/4-inch plywood underlayment was then nailed over the remnants of the linoleum flooring, and vinyl sheet flooring was installed over that.

With the original pine flooring exposed and brought back from the dead, the entire stairwell feels more homey and less institutional and decrepit. The original flooring isn’t perfect by any means. Not surprisingly, it seems that the flooring in the entryway and stairwell has been abused more than the floors elsewhere in the building. Several floorboards are scarred with dark gouges, while others are streaked with dark water stains (possibly from leaky steam radiators?). Pine is a soft wood and all of the floorboards sport nicks and bruises and scrapes, and have a darker amber tone than the pine flooring in the rest of the building. But I don’t mind these imperfections; they speak to the building’s long history and help ground the space.

Original Pine Flooring Close-up

I’m also hoping to find a runner or two for the entryway and laundry area, which will cover some of the floor’s more obvious patches and blemishes. Speaking of the ground-floor laundry area, it’s also been completely transformed by the refinished floors.

Laundry Area Floors 1

Laundry Area Floors 2

The original floorboards on the second-floor landing were never covered over, but the finish had almost completely worn off and they were in desperate need of refinishing. Here’s how the landing turned out:

Refinished Landing

Refinishing the floors really highlighted the curved edge of the landing, which will eventually be surrounded by a railing.

Refinished Landing Curved Edge

With the stairwell flooring finished, Gregg can begin reinstalling the handrail, newel posts, and balusters. And after that, I can begin a long list of finish work. Stay tuned.

Aug 242015
 
 August 24, 2015  Uncategorized 4 Responses »

Refinishing floors is almost always a logistical nightmare. It involves completely emptying a portion of your home and agreeing not to enter the area for at least two or three days. Things get even more complicated if the area to be refinished happens to include the primary entryway and common laundry for four condos. So I knew finding a convenient time to refinish the floors in the stairwell would be a challenge. But luckily, all of my neighbors were just as anxious as me to finally get the stairwell floors cleaned up and finished. And who could blame us? The floors have looked like this for the past few weeks:

Original Floors Ground Floor

Besides finding a time to refinish the floors that accommodated everyone’s schedule, we also needed to schedule the refinishing around the rest of the renovation work in the stairwell, and all things considered, this week seemed like an ideal time. We’ve reached a point where most of the carpentry work on the stairs is complete, so there’s less risk of damaging the refinished floors during later work. But we haven’t reinstalled the handrail yet, so the flooring guys  have easy access to the floorboards around the balusters.

But before the floors were refinished, I needed to patch all of the holes left behind years ago when the old steam radiators and steam pipes were removed from the building.

Radiator Holes in Stairwell Floor

To patch these circular holes, which ranged in size from about 1 inch to 2.5 inches in diameter, I used a jigsaw to cut circular plugs out of some scrap pine (the pine was pre-primed, but the primer will be sanded off before the floor is finished). I traced out each of the circles with a compass and held the jigsaw at a slight angle as I cut so that each plug was slightly tapered.

Circular Flooring PlugAfter sanding down the rough edges, I ran a bead of wood glue around the outer edge of each plug, and then hammered it into place with a rubber mallet.

Circular Floor Plugs

Circular Floor Plugs

Although these plugs might not look perfect, they’re sturdy and should be pretty inconspicuous once the floors are finished. And plugging the holes just seemed more practical than completely replacing all of the floorboards with holes cut through them.

The refinishers showed up early this morning, and by the time I got home from work, they had sanded the floors and put down the first coat of polyurethane. I peeked in the front door at the still-wet floors when I got home, and I think it’s safe to say that the original, refinished, pine floors are going to make a huge difference in the overall appearance of the stairwell. I managed to snap a few blurry phone pictures of the in-progress floors. Here’s the flooring just inside the front door:

Refinished Stairwell Floors In Progress

There’s some gouging and discoloring on a few floorboards, along with a haphazard patch job in the middle of the hallway, but let’s just say it adds a lot of character to the space. Here’s an overhead shot showing the little landing at the top of the ground floor stairs, which was apparently redone in tongue and groove heart pine flooring at some point:

Refinished Stairwell Floors In Progress

And finally, here’s the second floor landing:

Refinished Stairwell Floors In Progress

I can’t wait to see how the floors turn out after two more coats of polyurethane. I’ll be back at the end of the week with some pictures of the finished floors.

Jul 272015
 
 July 27, 2015  Uncategorized 9 Responses »

Over the past few weeks, our contractor, Gregg, has finished the bulk of the repair work on the stairs. He’s almost ready to begin reinstalling the original newel post and handrail. But all of this progress has reminded me just how much work I have left to do in the stairwell. Once Gregg is done, I’ll still need to stain and seal the treads, add a new coat of varnish to the handrail and newel post, paint the balusters, risers, and the exposed edge of the staircase, skim coat and paint the walls, and lots of other stuff I haven’t thought of yet.

But before I can start most of that work, Gregg needs to put the stairs back together. After a break for the Fourth of July, Gregg finished installing the last of the replacement treads. The entire two flights of stairs are now straight and level, and walking upstairs no longer feels like quite the adventure it once did. Gregg used flooring adhesive to secure the treads, so they don’t even creak. Here’s a look at the complete, second flight of stair treads.

Second Flight of Stairs New Treads

At the top of the second flight, Gregg added a little curved piece of wood to the front of the landing to match the curve of the last riser.

Curved Landing

This little detail had been lost at some point when the flooring was replaced on the landing.

With all of the treads replaced, Gregg moved on to installing the end pieces on all of the new treads. Traditionally, in a staircase like ours where one side of the stairs is open, the treads are constructed in two pieces – the main body of the tread and a little end piece called the return, which typically runs an inch or two beyond the end of the tread, giving the appearance that the tread is set into the riser. The return is joined to the rest of the tread with a 45-degree miter joint. I don’t know why treads are constructed this way. In many cases it would be just as easy, maybe easier, for a carpenter to cut the entire tread, return and all, from a single piece of wood. But I guess this two-piece construction is the way it has always been done, and now it’s considered a sign of good craftsmanship. So that’s the way Gregg decided to make the treads.

Curved ReturnOf course, making the returns was complicated by the fact that the inner edge of many of the treads is curved. Gregg used a jig saw to custom cut each of these curved returns and added the outer bull-nosed edge with a router. He shaved and sanded each return until it fit perfectly. The results are impressive, more impressive even than the old stairs, since without any paint obscuring it, you can see the tight joint between the tread and the return. Here’s an overhead shot of a few of the curved treads.

Curved ReturnsGregg decided to add 3/4-inch cove moulding under each of the returns, since that’s what was originally there. But making curved cove moulding is even more challenging than making curved returns. The original moulding was carved from solid wood, but given our timeline and budget for this project, hand-carved moulding isn’t a practical option. Instead, Gregg ordered some flexible cove moulding, which showed up this past week. The flexible moulding is made out of what feels like dense rubber, and it arrived coiled up in a box. It’s a weird material, and it took Gregg some time to get used to working with it. But after he installed a piece on the first step, it looks pretty flawless. It’s supposed to be paintable, so it should blend right in with the rest of the moulding.

Flexible Cove MouldingWhile Gregg worked on the stairs, I finished cleaning the original handrail and newel post. I continued my strategy of wiping down each section of the handrail with a rag soaked in mineral spirits, and when I was done, I had removed a ton of brown-black gunk from the handrail (most of which was probably decades-old grease from peoples’ hands).

Cleaned Newel Post

Once the mineral spirits had completely evaporated, I could see that the underlying finish was really uneven. The finish had completely worn off on the parts of the handrail that people had grabbed the most over the years, particularly where the staircase turns, but the finish was intact in other places. You can kind of see what I’m talking about in this picture:

Handrail Uneven FinishOnce the handrail is reinstalled, I’ll probably add a new coat of polyurethane to the whole thing to even everything out.

By the end of last week, Gregg had finished installing all of the moulding on the first flight of stairs.

Stairwell Cove MouldlingAs you can see, there are still some big gaps that were created when the new treads were shimmed and leveled. But we (or I should say Gregg, it was completely his idea) have a plan to (hopefully) quickly and easily patch over these gaps, leaving everything smooth and seamless. But more on that next time.

Jun 282015
 
 June 28, 2015  Uncategorized 6 Responses »

The original newel posts and handrail might be the most impressive part of the stairwell. They’re constructed from tightly-grained, solid walnut. The handrail twists and winds its way up a curved flight of stairs and across a landing before doubling back and climbing a second flight of tightly curved stairs, terminating at a small newel post on the third floor. Although it was fabricated in several sections, once assembled, the handrail looks like a single strip of undulating wood. Just how craftsmen wrought this sinuous, fluid form from solid wood over 150 years ago using only hand tools remains a mystery to me.

Curved Handrail

In any case, the handrail seems like an irreplaceable part of the stairs. Or, at least, it would be so expensive to replicate that it may as well be irreplaceable. Even so, it’s gotten pretty dirty and dinged up over the years, and I felt like I should do something with it while it’s disassembled. But I didn’t want to remove all of it’s character by, say, sanding it down to bare wood. Cleaning it seemed like a good place to start.

But after wiping down a short section of the handrail with soapy water, it was still coated in some sort of dark, gunky grime. “You’d be surprised at how much skin grease builds up on stuff that people touch” my brother, who works as an art conservator, explained when I asked him how best to proceed with the handrail. I was worried about messing up the original finish, which I assumed was an old varnish or laquer, if I used a harsher cleaning agent to remove the grease and oil that had accumulated over a century-and-a-half of people running their hands over the railing. My brother recommended low VOC mineral spirits, which should dissolve grease and wax without disturbing the original varnish. Here’s the handrail before I started cleaning it:

Handrail Before

As I wiped down the same small section of handrail with a rag soaked in mineral spirits, the rag picked up a surprising amount of dark brown-black gunk. As the mineral spirits evaporated, I realized that there wasn’t any finish left on the handrail – I had cleaned it down to bare wood.

Handrail After

This might mean that the original finish was just paste wax that dissolved in the mineral spirits. Or, the original finish could have been lacquer, which was degraded by years of exposure to oil from peoples’ hands. Or maybe, the original finish has long since worn away and the current “finish” is just a layer of grime and skin oil.

Either way, it seems like the thing to do is to refinish the entire handrail, first removing all of the dirt and grime and any remaining old finish with mineral spirits, and then applying a new finish. It’s looking like the refinished walnut will be lighter than the current finish/dirt, but the grain of the wood will be more visible as well. All in all, I think it will be an improvement, not least because the handrail will finally be clean, probably for the first time in over a century.

Later in the week, Mara and I began skim coating the stairwell walls. The walls are currently covered in a lumpy, chunky, textured plaster treatment that makes the stairwell look like a mine shaft. Here’s a close-up look:

stair trim

Originally, the walls would have been smooth plaster, like they are elsewhere in the building. Skim coating all of the walls will be a big project, but I think it will make a huge difference in the overall appearance of the stairwell. I started with the wall directly outside the front door to my unit. This wall is one of the few flat walls in the stairwell – most of the walls and even the ceilings are made up of curved plaster work – so it seemed like a good place to start.

As I’ve renovated the condo over the past few years, I’ve done my fair share of skim coating (it kind of comes with the territory when you’re fixing up an old house), and I’ve come up with a skim coating technique that seems to work for me. I use premixed joint compound with a little bit of water mixed in to make it more manageable and to give me some more time before it begins to dry. I start by applying joint compound to a section of the wall with a drywall knife. I get things as smooth as possible with the drywall knife, but I don’t obsess over little marks and ridges. Then, while the joint compound is still wet, I go over it with a magic trowel (which is really just a big, heavy duty squeegee) to achieve a smooth finish. Once I’ve added the last coat, and the joint compound is completely dry, I lightly sand the whole wall before priming and painting. I’ve started to get faster at skim coating, but it’s still a time consuming process. We managed to get the first coat of joint compound on this weekend, but it looks like the stairwell walls will take at least two coats of joint compound to fully cover the lumpy, textured plaster. Here’s current state of the wall – the skim coated wall is to the right, and the wall on the left is still covered in the textured plaster.

Skim Coat First Coat

Meanwhile, Gregg continued replacing the treads on the second flight of stairs. By the end of the week, he only had one tread left to go. Here’s a progress shot of the second flight of stairs where you can see just how out-of-level the original treads had become.

Second Flight Progress

Second Flight Progress

Gregg will finish putting together and installing the last tread at the beginning of next week and then move on to installing trim.

Jun 182015
 
 June 18, 2015  Living Room 17 Responses »

When I decided to install a built-in hutch in the living room, I only had a few goals for the project – first and foremost, I wanted a spot to hang the tv without having to deal with a bunch of cables running down the wall; I figured some extra storage space and a few shelves for books would be nice; and finally, I didn’t want the new cabinetry to look completely out-of-place in the room. But now that it’s installed and nearly finished, I think it’s safe to say that the new built-in has exceeded these modest goals.

A few weeks ago, the corner of the living room next to the fireplace was dark, barren, and made all-but unusable by an awkwardly situated baseboard radiator. We mounted the tv in this corner, but the mess of cables running down the wall and a general sense of emptiness left this part of the room looking unfinished.

Corner TV Wall

You might notice in the picture above that all of the power cables are plugged into an outlet on the left wall. We quickly realized that a built-in cabinet would make it difficult to run power cables to this outlet. So I asked my electrician to add a new outlet directly behind the tv. He ran new wiring from the old outlet, around the corner, and up to the center of the wall, a process that involved cutting a pretty big chunk of plaster out of the corner of the wall. But no big deal, I knew this corner would soon be covered up by the new built-in.

Over the past month or so, Brandon, the owner of Grain Woodshop here in East Boston, constructed and installed the built-in. He built the hutch in his shop in three pieces – a lower, four-drawer unit, an open space for the tv, and an upper shelving unit. He securely attached these three pieces to the wall using some carpentry wizardry, somehow insuring that everything was straight and level and really solid, despite the walls being uneven and not-so-solid. Here’s the cabinet carcass after the first day of installation work. (“cabinet carcass,” by the way, is an unappealing name for the cabinet box and frame; although the name might conjure images of a freshly killed and skinned cabinet, carcass construction is actually one of the first steps on the way to building a living, breathing, finished cabinet.)

Cabinet Carcass

I decided that I didn’t want the shelving to go all the way to the ceiling for reasons both practical (I wouldn’t be able to reach the upper shelves) and aesthetic (a lower height would keep the built-in in line with the heights of the room’s windows). So next, Brandon filled in the gap between the top of the hutch and the ceiling with a piece of sheetrock.

Sheetrock Over Cabinet

And I taped and mudded the sheetrock so that it blends in seamlessly with the surrounding walls. Here it is after one coat of primer.

Finished Sheetrock Above Cabinet

Next Brandon added the drawer fronts, and began installing the trim. He added a baseboard with a heating register grill set into it to allow heat from the radiator, which by this point was buried under the cabinet, to escape. Brandon custom milled casing for the built-in to match the original casing that surrounds the room’s doors and windows. But as he was installing the casing, we ran into a problem.

Cabinet Progress

Cabinet Outlet Problem

As you can see, the old outlet was in the way of the new casing. After consulting with my electrician, I decided that the best solution was to move the old outlet two inches to the left so that it would just clear the casing. Although I’d never done it before, moving the outlet wasn’t all that difficult. I turned off power to the circuit at the breaker box, removed the old outlet and pulled the wiring out of the electrical box. Then I cut out a section of plaster, added a new electrical box, and rewired the outlet. Since there’s no stud next to the new outlet, I had to use a “remodeling electrical box” which is designed to clamp onto the wall without the need for a stud.

Moved Outlet And here’s the new outlet after I patched and painted the surrounding wall.

Moved Outlet Finished This past week, with the outlet out of the way, Brandon finished installing the trim and put a coat of paint on everything. The hutch isn’t completely finished – it needs another coat of paint, the drawer glides aren’t finished, and the drawers need pulls – but the bulk of the work is done, and it looks great. The whole room actually feels more balanced than it did without the built-in. The casing around the hutch reflects the size and proportions of the casing around the room’s windows, bringing some symmetry to the fireplace wall.

Finished Built-in Hutch

Finished Built-in Hutch

There have been a few other changes in the living room over the past few months, so look out for a living room update at some point when the built-in is finished.

Finished Built-in Hutch

Jun 072015
 
 June 7, 2015  Uncategorized 7 Responses »

The finished staircase came into focus this week as our contractor, Gregg, finished installing new treads and risers on the first flight of stairs. Gregg spent most of last week custom milling curved treads for the first five steps. But things went more quickly this week as he moved on to a straight run of about eight steps with rectangular treads – instead of cutting the treads into weird, curved shapes and recreating the front, bull-nosed edge with a router, Gregg was able to simply cut the pre-made treads to size and install them.

As Gregg installed one tread after another over the course of the week, it became increasingly obvious just how crooked the old steps had been. As they climbed higher, each step became more crooked than the last, and with new, level treads providing a point of reference, the stairs started to look really wacky.

old stairs new treads

Gregg shimmed each tread, some as much as two inches on one side, and then glued and nailed them into place. The extreme shimming means we’ll have to figure out how to cover the newly-created gaps along the edge of the stairs. Trim will cover about an inch of the gap, but we might have to patch in the rest with some thin pieces of plywood.

Shimmed Stair Treads

Things slowed down a bit again as Gregg reached the next section of curved stairs near the top of the first flight where the stairs turn the corner to the second floor landing.

Corner Stairs

As the stairs curve around this corner, the inner and outer edges of each tread follows the circumference of a giant circle. Again, Gregg had to custom mill each of these treads. The inner edges of the treads in this corner of the stairwell follow a tight curve, so some of these treads are pretty weird shapes.

Corner Tread 2

Corner Tread 1

By the end of the week, all of the new treads and risers were in place on the first flight of stairs.

First Flight With New Treads

The Stairwell at the End of Week 3

This past weekend I started pulling up the vinyl sheet flooring and plywood underlayment on the ground floor of the stairwell, in our communal laundry area. I used the same pry-bar-and-brute-force technique that I used to remove the plywood underlayment in the entryway. But since it was an unseasonable 80-something degrees last weekend, I only managed to pull up half of the old flooring before deciding it was just too damn hot to keep working. My downstairs neighbor pitched in later in the week (once it had cooled off) and pulled up the rest of the old flooring in an afternoon. With the plywood underlayment gone, we were left with this:

Original Floors Ground Floor

I’m aware that it looks like an awful mess, and you’ll just have to trust me that there are original pine floorboards under all of this. The splotchy gray stuff is the same paper underlayment (possibly linoleum backing paper) that we found under the plywood underlayment in the entryway. I sent a sample of this paper out for asbestos testing at the same time that I had the paper backing from the entryway tested. And like the paper in the entryway, this paper was asbestos free. So we’ll just let the flooring guys sand through it when they refinish the floors.

We also uncovered a fairly sizable hole that was cut clear through the original floorboards and subfloor along the edge of the hallway.

Hole in the Floor

There was a length of cast iron pipe that was not connected to anything and was just sort of wedged into the hole. I’m guessing the pipe used to serve an old steam radiator. I’m not sure why someone decided to leave this piece of pipe dangling here, covered over with a plywood underlayment. Once I cleared out the pipe and a few chunks of unsecured wood, the hole was completely open to the cellar below.

Open Hole in the Floor

I encountered a similar situation when I uncovered the original floors in the kitchen. I decided to shuffle floorboards around in the kitchen to patch the hole seamlessly. But since this is an entirely utilitarian space where no one spends much time, I’ll probably just patch the hole as it is.

Gregg will tackle the second flight of stairs next week, and I’m hoping to get started cleaning up the original handrail and newel post.

May 312015
 
 May 31, 2015  Uncategorized 8 Responses »

Over the past two weeks, the stairwell has been reduced to a grimy construction site. But somehow, each day that I came home this week and walked through the front door, I thought that the space looked better than I’ve ever seen it. The stairwell has been stripped back to its bare bones. The dingy vinyl flooring, the chipped and sagging stair treads, the balusters caked with dozens of layers of cracked paint – all of it’s gone. And there’s something satisfying about that; it feels like a sorely needed fresh start for this well-used, more-than-160-year-old space.

When we left off last time, I had just finished pulling up the vinyl flooring and plywood underlayment in the entryway. Once the plywood was up, I noticed some patches of old, gray paper stuck to the original pine floorboards, but I figured the flooring guys would have no problem sanding off the paper while refinishing the floors. It wasn’t until later that it occurred to me that this old paper could contain asbestos. And the more I looked into it, the more it seemed like the paper was the backing from an old linoleum floor that had since been removed. And the information I found online about asbestos content in old linoleum backing paper ranged from ‘almost certainly contains asbestos’ to ‘definitely contains asbestos.’

Stairwell Floors

So much for sanding off the paper, I thought. But just to be sure, I mailed a sample of the paper to an asbestos testing lab, and a few days later I got the results back – no asbestos. So I guess even if everyone tells you that a certain building material contains asbestos, it’s worth actually having the material tested. Especially considering that the test only costs $20-30 and takes about a day plus shipping time.

While I was worrying about asbestos in the floors this week, our contractor, Gregg, got started rebuilding the stairs. At the beginning of the week, he installed a new stringer against the wall along the straight section of the stairs. The new stringer wasn’t installed for structural reasons, but instead will provide a surface for attaching the new treads, since the original stringer is buried in the wall. You can see the new stringer here on the left:

New Stair Stringer

The first five steps are curved, and Gregg spent most of the week custom milling treads to fit the curvature of the original stairs. We’re replacing the old, pine stair treads with new, pre-made, red oak treads. But the new, pre-cut treads are rectangular. So to make each of the curved treads covering the first five steps, Gregg cut two of the pre-made treads into the correct shapes, used a router along the curved, front edge of the tread to recreate the rounded, bull-nosed front, and finally glued the front and back sections of the tread together. Here’s the tread for the first step clamped and glued and awaiting final installation:

Glued Stair Tread

And here’s the first tread after it was installed, photo courtesy of Gregg.

First Curved Stair TreadGregg used flexible vinyl boards for the curved risers. The vinyl easily conforms to the contours of the original, underlying, curved substructure. And once it’s patched and painted, it will be indistinguishable from the surrounding wood trim.

Gregg repeated the process of cutting, gluing, and installing curved treads for the next four steps. Each step is a slightly different shape, so it was a time-consuming process.

Newly Installed Stair Treads

After installing each tread, Gregg covered it with rosin paper to protect it until I get around to staining and finishing the treads. The stairs are so out-of-level that the new treads are shimmed about an inch and a half on one side to make them level.

Shimmed Stair Treads

Now that most of the complicated, curved steps are out of the way, the re-treading process should move along more quickly – most of the remaining treads are more straightforward rectangle or triangle shapes.

Stairwell at the end of week 2


May 222015
 
 May 22, 2015  Uncategorized 11 Responses »

Renovation work on the stairwell kicked off this week, and I think it’s safe to say we’ve officially reached the point of no return. The old entranceway floor is gone, the stair railing is down, and the stairs are pretty thoroughly torn up. But I’m getting ahead of myself. Here’s where we started a week ago:

Front Stairs

The stairs were intact and I’d just finished repairing the ceiling on the ground floor of the stairwell. I’ve been working on this ceiling off and on for what seems like forever – adding more joint compound here and there, sanding, trying to get a smooth finish – but I finally decided that it was good enough. To recap, last winter a portion of the original plaster ceiling had cracked and buckled and seemed ready to collapse at any moment. It looked like this:

Cracked Plaster Ceiling

So I removed the plaster, replaced it with a piece of sheetrock, and stabilized the surrounding plaster with screws and plaster buttons. Then I taped and skim coated over all of the seams and cracks and plaster buttons with joint compound.

Since I was patching over small areas of the ceiling and wasn’t skim coating the whole thing, it didn’t look perfectly smooth when I was done with it. But it definitely looked better than it did when I started, which seemed good enough. Besides, this ceiling has been patched and repaired so many times that it’s now a sort of franken-ceiling made up of bits and pieces of original plaster, sheetrock, joint compound, caulk, layer upon layer of paint, and some wood thrown in for good measure. So at some point I decided to stop messing with it and just primed and painted the whole thing with flat white ceiling paint, which helps disguise some of the imperfections.

Ground Floor Ceiling

This past weekend I moved upstairs to the entranceway and began pulling up the old vinyl floor. The vinyl sheet flooring was laid over a 1/4-inch plywood underlayment. I assumed that this plywood was nailed on top of the original wide-plank pine floors, but there really wasn’t any way to know what lay beneath the plywood until I started tearing it up. Starting along the edge of the hallway by the stairs, I pried up a corner of the plywood underlayment. I peeked underneath and, in the moment of truth, caught a glimpse of intact, pine floorboards.

uncovering pine floors

Encouraged by the sight of the original floors, I worked my way down the hallway using a combination of a pry bar, a rubber mallet, a claw hammer, and brute strength to pull up the plywood underlayment and the vinyl sheeting along with it. Five hours later I was left with a sore back and an unfinished – some might call it rustic, others might call it filthy – pine floor. Admittedly, the floor looks pretty terrible at this point, and I would be nervous if I hadn’t done this before. Even though the floor currently looks like it belongs in a barn, I know it will turn out beautifully once it’s refinished.

At the beginning of the week, our contractor, Gregg, started taking apart the stairs in preparation for replacing the treads and risers. As he gradually dismantled first the handrail and balusters and then the old treads and risers, he uncovered the guts of the stairs and was able to see how they were constructed. Luckily, everything seemed to be structurally sound.

My guess would be that the entire staircase was ordered as a kit when the house was built. In the mid-1800s when our building was constructed, mass production of house parts had just begun to make fancier architectural elements – like, for instance, a curved staircase – more readily available. Even so, a lot of the stair parts seem to be of higher quality than anything you could buy today. Gregg was surprised to find that the bullnose trim along the edges of the treads, some of which is curved, was carved from single pieces of wood. Unfortunately, most of this trim was too cracked and brittle to salvage. Here’s a few pieces of trim after they were removed.

Curved Stair Trim


Curved Stair Trim

Gregg is planning to replicate this trim as closely as possible, but he’ll probably use two pieces of trim to achieve the same look.

The curved handrail that winds its way up two flights was milled from solid wood in several sections. Each section attaches to the next with a threaded pin imbedded in the center of the handrail. I’m debating whether I should try to refinish the handrail while it’s disassembled.

Curved Handrail Section

The newel post was also secured by a long, threaded pin that ran from the top of the post all the way to the floor.

Newel Post Top


Newel Post Bottom

The interior of the newel post seems like a great hiding spot. But, unfortunately, we didn’t find any jewels or treasure maps, or important documents hidden inside.

Gregg carefully took the handrail and newel post apart and will reinstall them once the new treads and balusters are in place. In the meantime, he put up a temporary handrail made from 2x4s.

Temporary Railing

The original balusters were round and unadorned. Some of them had been replaced with mismatched dowels over the years. As Gregg pulled down the balusters, he discovered that several of them were solid, iron rods. These metal balusters had an upside-down-V-shaped bracket at their base, which was bolted to the stairs and hidden under a riser.

Iron Baluster

The iron balusters were evenly spaced along the length of the staircase and must have provided a way to keep the railing secure and rigid.

The stairs themselves were built over ‘sub stairs,’ for lack of a better term. As far as I know, the treads and risers on most modern stairs are laid directly across the stringers with nothing underneath. But beneath the finished treads and risers on our stairs there’s another set of solid wood surfaces that provide structure.

Stair Structure

The underlying structure of the risers was made from a series of vertical boards, sort of like a barrel, which allowed some of the steps to have a curved riser. Gregg found that all of the curved woodwork on the stairs was made by cutting a series of parallel notches into the back of a thin piece of wood to make it flexible and then bending the wood into place and securing it, a process that required some serious carpentry skill, especially considering that this curved woodwork has held up for 150 years without beginning to look angular. Here’s the back of one of the curved risers:

Notched, Curved Riser

In the 1800s, East Boston was home to a booming shipbuilding industry, and it’s possible that some of the workers who built our building also worked as shipbuilders, which might explain their experience working with curved wood.

All of the new treads and risers are awaiting installation in the cellar, and next week, Gregg will start putting the stairs back together.